Optimal Angle for Solar Panels: Quick, Proven Tips
Get the best tilt and azimuth for your latitude. See when east/west wins, fixed vs seasonal tilt, and easy shading fixes to boost real-world output.
Quick Story: My Roof Isn’t Perfect—Yours Doesn’t Have to Be
When I first checked my roof pitch and azimuth angle, I groaned. Not quite true south orientation, a chimney that creates partial shading, and a neighbor’s tree right in the sun path. I assumed my photovoltaic system would underperform. It didn’t. With a practical tilt angle near my latitude, smarter solar panel orientation for time-of-use rates, and a bit of shading analysis, my array delivers the energy yield I actually need.
TL;DR Snapshot (Skimmer Stopper)
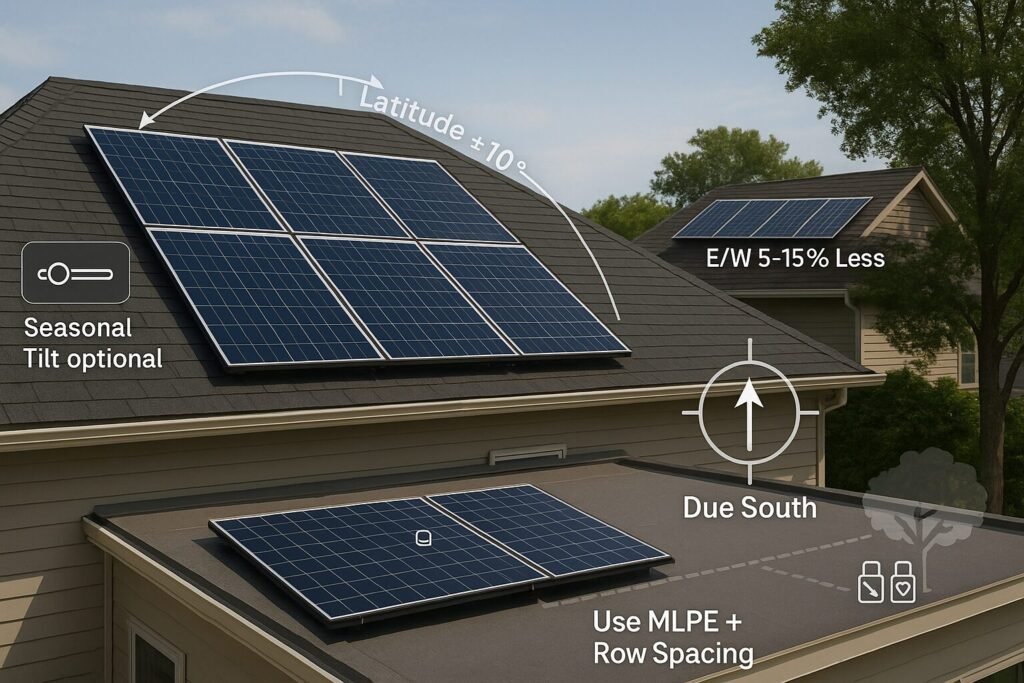
- Fixed tilt: Aim near your latitude (±10–15°) for the best angle for solar panels and strong annual production.
- Optimal azimuth: Due south in the Northern Hemisphere (north in SH) typically maximizes solar energy output.
- East/West facing solar panels: Often ~5–15% less than south but can save more with TOU pricing and evening loads.
- Seasonal vs fixed tilt: Seasonal boosts are modest; set-and-forget works for most homes.
- Shade mitigation: Prioritize clear sky; use microinverters or DC optimizers (MLPE) to reduce shading losses.
- Row spacing: Use winter solstice sun angle to avoid inter-row shading.
- Flat roof solar: Ballasted racking around 10–15°; mind wind uplift and leave service aisles.
- Ground-mounted solar system: Exact tilt/azimuth, cooler modules, easier cleaning, and room to expand.
The “Right” Tilt: Simple Rules That Actually Work
Why latitude works: A tilt near your geographic latitude captures a balanced share of annual irradiance without fuss. Staying close protects your performance ratio and capacity factor.
Good-enough envelope: Latitude ±10–15° keeps PV performance healthy. Past that, little incident-angle gains are often overshadowed by orientation or shading issues.
Step-by-Step: Find Your Fixed Tilt
- Check latitude (maps or a solar angle calculator).
- Measure roof pitch (phone inclinometer is fine).
- Compare and decide: If you’re off by >15°, consider tilt adjustment via racking or a ground mount.
- Prioritize: Fix shade and azimuth first; tilt fine-tuning comes after.
Takeaway: A stable, near-latitude fixed-tilt array beats a fussy setup you’ll never adjust.
Is Due South Always Best? When SW/W or SE/E Can Win
True south (NH) / true north (SH) usually produces the most kWh per year. But your load profile and TOU windows might tell a different story.
- Southwest/West orientation: Pushes power into late afternoon—great for TOU peak pricing or after-work self-consumption.
- Southeast/East orientation: Strong morning production for early-bird homes.
How I Choose (Real-World)
- Open my utility’s time-of-use rate chart.
- Sketch our household load (cooking, laundry, AC, EV charging).
- If evenings are expensive, a west-facing solar layout often lowers bills even with slightly fewer kWh.
Takeaway: Don’t just chase kWh—chase the right kWh at the right time.
Seasonal Tilt vs Fixed Tilt: Worth the Ladder Trips?
Reality check: Adjustable tilt can nudge specific yield, but gains are usually modest for homeowners.
- Winter tilt: latitude +10–15°
- Summer tilt: latitude –10–15°
My approach: I run fixed-tilt near latitude and focus on module cleaning and shade mitigation to preserve solar panel efficiency.
Takeaway: For most homes, set-and-forget wins on simplicity and safety.
Racking Can Nudge Tilt—How Much, and Is It Worth It?
Typical adjustability: Many racking systems allow a few to ~15° of tilt adjustment.
Worth it when:
- Roof pitch is far from the latitude.
- You need better drainage on low-slope or flat roofs.
- Snow shedding matters in winter.
Less value when: You already have fair tilt, clean optimal azimuth, and minimal shade. The marginal gain is small.
Takeaway: Fix orientation and shading before chasing small tilt gains.
East/West Roofs: How Much Do You Really Lose?
Rule of thumb: ~5–15% less annual solar panel output than south at the same tilt.
Why I still like E/W sometimes:
- A flatter production curve that’s easy to self-consume.
- West bias pairs well with battery storage for evening loads.
- Can reduce inverter clipping at noon.
Offsets: If allowed, add a module, refine inverter sizing, or lean west to align with TOU peaks.
Takeaway: East/West isn’t “bad”—it’s often strategic.
What’s the Optimal Azimuth—And How Do I Measure It?
No special gear needed.
My Quick Method (Good Enough for Planning)
- Open a satellite map and align your roof edge.
- Use a compass app.
- Correct for magnetic declination to get true north.
- Read the azimuth angle (degrees from true north): 180° ≈ due south.
Accuracy within ±5–10° is fine for early solar panel placement decisions and PV design sketches.
Takeaway: Measure once; decide confidently.
Row Spacing & Self-Shading: Don’t Let Panels Shade Panels
For multi-row arrays (roof or ground), avoid row-to-row shading—especially at winter solar noon.
Quick Spacing Rule (Simple)
Minimum spacing between row fronts ≈ (rear-row height above front) ÷ tan(winter noon sun angle).
Plain English: Steeper tilts need more inter-row spacing. Tight site? Reduce tilt slightly or, on trackers, use backtracking.
DIY sanity check: I’ve used cardboard templates on a sunny winter day to visualize shadows—surprisingly effective.
Takeaway: A few inches on paper can be a lot of kWh in winter.
Trees, Chimneys, and Odd Shadows: Shade Happens—Plan for It
Prioritize clear sky windows at 9 am/noon / 3 pm. Those checkpoints catch most real-world shading issues.
Mitigation that works:
- MLPE (microinverters or DC optimizers): Keeps one shaded module from dragging down the string; improves MPPT behavior.
- Module placement: Avoid repeat offenders like flues and vents; reduce cell-level mismatch.
- Targeted trimming: Small branches can reduce shading losses and hotspot risk.
Takeaway: Shade won’t be perfect. Your design can be.
Flat Roofs: Ballasted Tilt, Wind, and Layout That Works
Typical angle: 10–15° ballasted racking to improve drainage and boost solar panel efficiency.
Design notes I follow:
- Respect edge and corner zones for wind uplift.
- Maintain service aisles for cleaning and airflow (cooler modules = better performance).
- Choose portrait vs landscape based on ballast needs and roof geometry.
- Don’t crowd parapets; turbulence affects anchors and output.
Takeaway: Flat roofs are great for maintenance access and staged capacity additions.
Ground Mounts: Angle Freedom, Cooler Panels, Easier Cleaning
Why I love them:
- Dial the exact optimal angle for solar panels and optimal azimuth for your site.
- Better convective cooling improves module efficiency.
- Cleaning is quick; expansion is easy.
Trade-offs: Trenching, yard space, fencing, and structures designed for local wind/snow loads.
Best when: The roof has poor orientation or chronic shade, or you may add a single-axis tracker later.
Takeaway: If the roof fights you, the ground often wins quietly.
Are Trackers Worth It at Home?
- Single-axis tracker: Follows the sun east-to-west; boosts energy yield (especially afternoons) and uses backtracking to limit row shade.
- Dual-axis tracker: Maximizes isolation capture, but adds cost and complexity.
Home reality: With unshaded space and high TOU prices, a single-axis on a ground mount can make sense. Otherwise, fixed-tilt near latitude is wonderfully simple.
Takeaway: Trackers are a situational upgrade, not a must-have.
Mini Planner: Quick Inputs, Quick Answers
Have ready: latitude, roof pitch, true azimuth, major shade sources, TOU schedule, and (optional) net metering rules.
- Fixed tilt target: ≈ latitude
- Okay range: latitude ±10–15°
- Azimuth target: 180° (S) in NH, 0° (N) in SH
- Row spacing: Clear winter noon shadows
- Shading fix: Use MLPE where partial shading is unavoidable
- Optional: Consider battery storage to shift solar into evening peaks
Takeaway: Five inputs → a confident first-pass layout.
My Practical Checklist (Print-Friendly)
- Confirm latitude, roof pitch, and true azimuth
- Map shade at 9 / 12 / 3
- Choose: maximize kWh or optimize TOU bill
- Pick fixed tilt (default) or seasonal tilt (only if you’ll adjust)
- Select a string inverter or MLPE
- Calculate row spacing for the winter solstice
- If the roof is compromised, evaluate ground-mounted solar
- Leave maintenance access; plan for soiling cleanup
FAQs (Short, Skimmable)
How much do I lose with east/west vs south?
Typically ~5–15% annually; west-facing solar can still save more with time-of-use peaks.
Is seasonal tilt a must?
No. Fixed-tilt solar panels near the latitude work well; seasonal tweaks give modest specific yield bumps.
Does exact tilt matter a lot?
Less than azimuth and shading. Fix those to protect the solar panel output.
Can racking fix a non-ideal pitch?
Often by a few to ~15°. Bigger shifts? Consider a ground-mounted solar system.
Clear Takeaways (For Buyers & Decision-Makers)
- Unshaded sky + optimal azimuth beats micro-tilt perfection.
- Match solar panel placement to TOU rates, load profile, and net metering rules.
- Fixed tilt near latitude is efficient, low-maintenance, and reliable.
- If the roof fights you, a ground mount (or single-axis tracker) can outperform.
Helpful Resources
- The Basics of Solar Energy: From Sunlight to Electricity – Start from square one.
- What Affects Solar Panel Efficiency? Real-World Factors, Fixes, and Easy Wins – Get the most from your panels.
- How Long Do Solar Panels Last (Lifespan & Warranties) – Plan for decades of reliable power.
- External Resource: U.S. Department of Energy – How Solar Works