Solar Panel Cost & Setup for Microhomesteaders
Understand solar panel cost, incentives, and right-sizing: run a load audit, choose grid-tied/off-grid/hybrid, and plan batteries for year-round reliability.
TL;DR Snapshot (for skimmers)
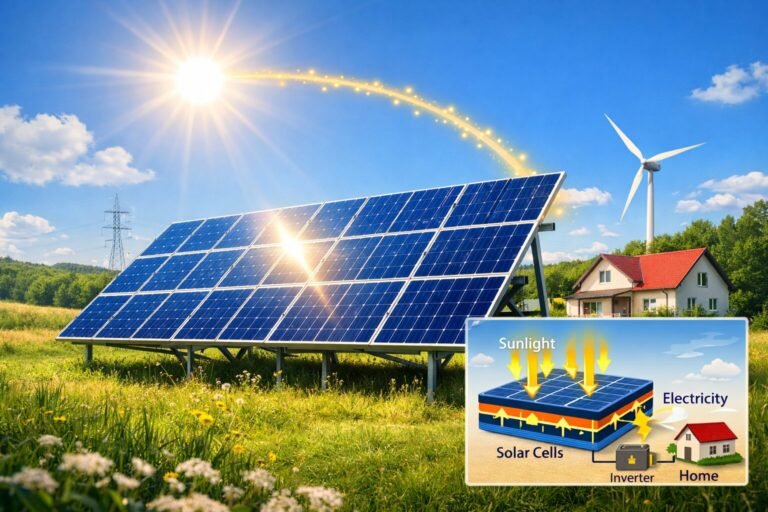
- PV in plain English: Sunlight knocks electrons loose in silicon → DC power → inverter makes AC for your home.
- Right-size fast: kWh/day ÷ peak-sun-hours ≈ array kW. Add batteries for nighttime/blackouts.
- Choose an architecture: Grid-tied (best ROI), Off-grid (max independence), Hybrid (backup + utility).
- Clouds & shade: Reduced but not zero. Night needs storage or a generator.
- Money: Incentives + realistic payback depend on your rates, export/buyback, and usage.
- Longevity: Panels 25–30 yrs, inverters 10–15, lithium batteries 10+, depending on cycles.
- Site matters: Tilt, azimuth, shading, wind/salt exposure.
- DIY vs pro: You can DIY small/off-grid; grid-tie usually needs permits and interconnection.
- Be blackout-ready: Critical loads sub-panel, transfer switch, and generator integration.
- Stay dialed: Monitor, troubleshoot, and leave room to expand.
Why I Went Solar (and What I Learned Fast)
When I started tinkering with solar, I wasn’t chasing perfection. I wanted fewer headaches during storms, lower bills, and the option to keep the lights on without babysitting a noisy generator. My early mistake? I focused on panel wattage and ignored the boring (but crucial) bits: daily energy use, inverter limits, battery autonomy, and the realities of shade.
This guide is the version I wish I had on day one—plain English, practical steps, and just enough theory so you can make confident choices for your home, cabin, or RV.
1) Plain-English Solar: How Sunlight Becomes Electricity
In one sentence: Photons from the sun hit a solar cell, bump electrons free, and create DC electricity that an inverter turns into AC for your outlets.
- PV effect, super simple: A solar cell has layers of silicon with an internal electric field. Sunlight energizes electrons; the field pushes them one way; wires give them a path → current.
- Solar energy vs solar power: Energy is how much you use over time (kWh). Power is the rate at any moment (kW).
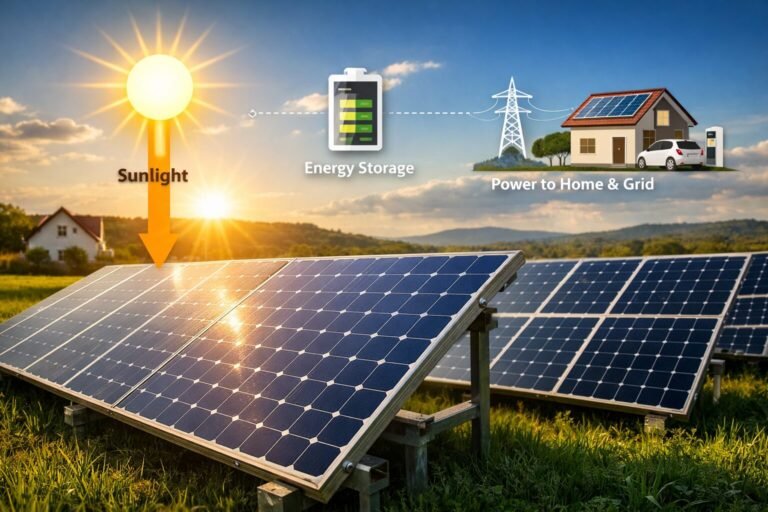
- Where power goes:
- First to active loads in your home,
- Then, to charge the battery (if you have one),
- Excess goes to the grid (grid-tie/hybrid) or gets curtailed (off-grid when batteries are full).
Key terms you’ll actually use: DC, AC, kWh, kW, MPPT, State of Charge (SoC), Depth of Discharge (DoD).
2) How Much Solar Do You Need? (Quick Sizing Method)
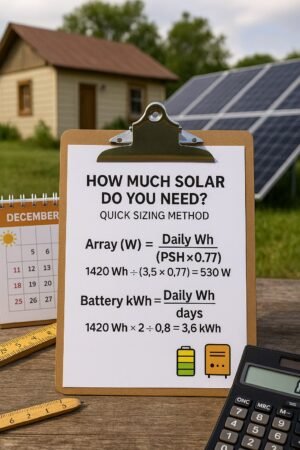
Here’s the simple path I use before spreadsheets:
Find your daily energy use
- From a bill or monitor, note kWh/day. If you only have monthly kWh:
monthly kWh ÷ 30 ≈ kWh/day. - Cabin/RV? Make a loads list (device watts × hours/day → Wh/day, then sum and ÷1000).
Convert kWh/day → array size (kW)
- Look up peak-sun-hours (PSH) for your location (average full-sun equivalents per day).
- Rule of thumb:
Array kW ≈ (kWh/day) ÷ (PSH × 0.75 to account for losses).- Example: 24 kWh/day, 5 PSH → 24 ÷ (5 × 0.75) ≈ 6.4 kW.
Inverter size (kW)
- A DC: AC ratio of ~1.1–1.3 is common. For 6.4 kW DC, many choose a ~5–6 kW inverter.
Battery capacity (kWh)
- Decide hours of autonomy for critical loads (fridge, lights, router, a few outlets).
- If critical loads average 800 W and you want 12 hours, 0.8 kW × 12 = 9.6 kWh.
- For lithium batteries, planning around 80–90% usable is typical.
Worked mini-examples
- Weekend cabin: 6 kWh/day, 5 PSH → 6 ÷ (5 × 0.75) ≈ 1.6 kW array; 5–10 kWh battery for overnight fridge/lights.
- Home: 24 kWh/day, 5 PSH → ~6.4 kW array; 10–20 kWh battery for critical loads + short outages.
- RV/van: 2 kWh/day, 5 PSH → ~0.5–0.6 kW array; 2–5 kWh battery, 12V loads where possible.
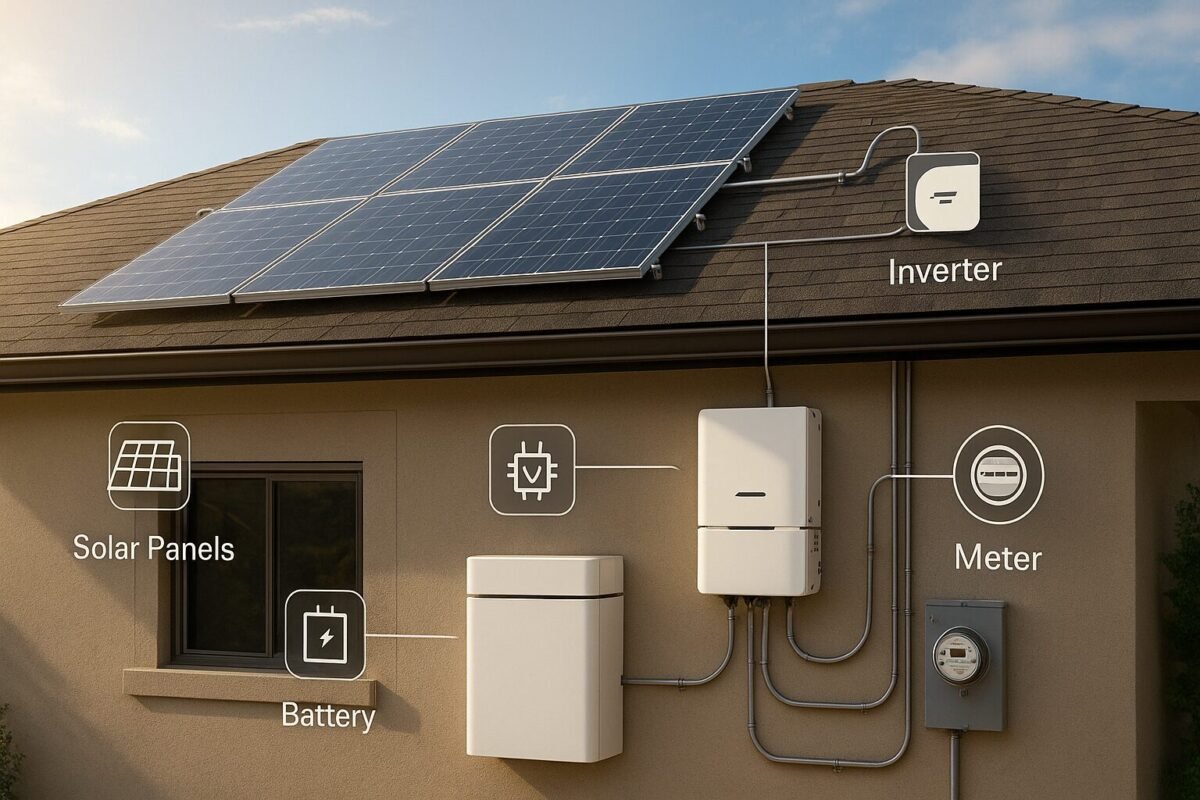
3) Solar System Components (What Each Part Does)
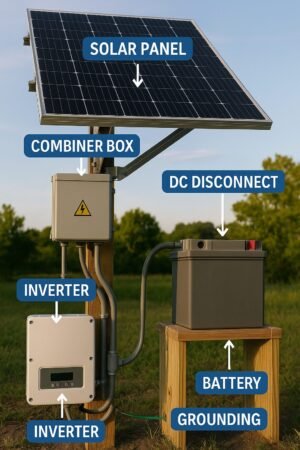
- Panels/Modules: Convert sunlight to DC. Look at efficiency, wattage, temperature coefficient, and durability (wind/salt ratings).
- Inverters:
- String (cost-effective, great in full sun),
- Microinverters (panel-level, better in shade/complex roofs),
- Hybrid (tie to grid + charge/discharge batteries).
- Charge controllers/MPPT: Optimize panel voltage/current for maximum harvest (off-grid/DC-coupled systems).
- Batteries:
- Lithium iron phosphate (LFP) = long cycle life, stable, lightweight.
- Lead-acid = lower upfront, heavier, more maintenance.
- Racking & mounts: Roof vs ground, tilt, corrosion resistance, uplift/wind ratings.
- Balance of system (BOS): Combiner boxes, breakers, disconnects, wiring, lugs, conduit.
- Safety & code items: Grounding/bonding, surge protection, rapid shutdown (roof systems), labeling.
- Monitoring: Inverter apps/portals for production, consumption, and battery SoC.
4) Grid-Tied vs Off-Grid vs Hybrid (Which Fits Self-Reliance?)
- Grid-tied: Best ROI and simplicity. Offsets your usage, but no backup unless you add batteries and a transfer solution.
- Off-grid: Full independence. Requires a larger battery bank and usually a generator for long cloudy stretches.
- Hybrid: Connects to the grid and a battery. Gives backup for critical loads + daily bill savings.
Decision Cues
- Live with frequent outages or remote? Hybrid or off-grid.
- Is the priority the shortest payback? Grid-tied (with or without a small backup battery for outages).
- Want resilience + savings? Hybrid hits the sweet spot for many homes.
60-second picker:
If outages are rare → Grid-tied.
If outages are common and you need seamless backup → Hybrid.
If no utility or you want full independence → Off-grid (with generator plan).
5) Weather, Shade & Night: What Really Happens
- Cloudy days: Expect reduced output, not zero. Cool temps can help panel efficiency.
- Shade: A few shaded cells can drag a whole string. Microinverters/optimizers and smart stringing reduce losses.
- Night: PV is zero at night. You’ll need batteries or a generator for overnight power.
- Design tips: Aim for good azimuth (south in the Northern Hemisphere), reasonable tilt (near your latitude), and minimal shade during peak hours.
Pro tip: If you have unavoidable morning or afternoon shade, module-level power electronics are usually worth it.
6) Costs, Incentives & Payback (Realistic View)
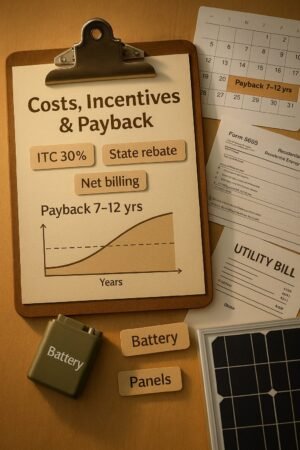
- What drives cost: Panel count, inverter type, battery size, BOS, labor, permits, inspections, and utility interconnection.
- Incentives: Look for federal tax credits plus state/utility programs and potential property/permit breaks.
- Payback basics:
- High electric rates + good export/buyback policies → faster payback.
- Lower rates, low exports, heavy shade → slower payback.
- Include degradation, battery cycle value (backup peace of mind), and future rate changes in your math.
- Ownership choices: Cash (best lifetime ROI), loan (spreads cost), third-party (low-friction but different benefits).
Buyer’s Clarity Box: Before you sign, ask: expected annual kWh, DC:AC ratio, shading assumptions, warranty terms, monitoring access, and scope of work (roof, trenching, main-panel upgrade).
7) Lifespan & Maintenance
- Panels: Expect 0.4–0.7%/yr degradation on modern modules and 25–30 years+ of service.
- Inverters: Plan for replacement around year 10–15 (warranty varies).
- Batteries: LFP often delivers thousands of cycles; life depends on depth of discharge, temperature, and charge profile.
- Maintenance:
- Clean when soiling is obvious (or after dusty/pollen events).
- Visual checks for loose conduit, hot spots, or shading changes.
- Update firmware and check alerts in your monitoring portal.
- Annual checklist: roof penetrations, clamps/torque marks, junction boxes, ground lugs, labeling, and emergency shutoff visibility.
8) Site & Design Factors That Matter Most
- Roof vs ground mount:
- Roof = closer to service panel, smaller BOS, uses existing space.
- Ground = easier cleaning, better cooling, ideal orientation/tilt, and more trenching.
- Tilt & azimuth: Best fixed tilt ≈ your latitude ±10°. Aim due south (north in the Southern Hemisphere).
- Shading analysis: Trees, chimneys, parapets—check shadows in peak hours across seasons.
- Climate/exposure: Hot roofs reduce output; coastal salt spray and wind uplift demand proper hardware and ratings.
- Aesthetics & setbacks: Keep pathways for firefighters, minimize exposed conduit, and think about curb appeal.
9) DIY vs Hiring a Pro
- DIY works best for small off-grid or RV systems and simple ground mounts.
- Grid-tied/hybrid almost always needs permits, plansets, and utility interconnection.
- Skills & tools: Electrical basics, torque wrenches, MC4 crimping, multimeter use, fall protection, lockout/tagout.
- When to hire: Complex roofs, high wind zones, structural upgrades, service-panel work, or when you value a turnkey warranty.
Safety first: DC arcs are no joke. Use PPE, watch array voltage in series strings, and follow rapid-shutdown requirements.
10) Blackouts, Critical Loads & Generator Integration
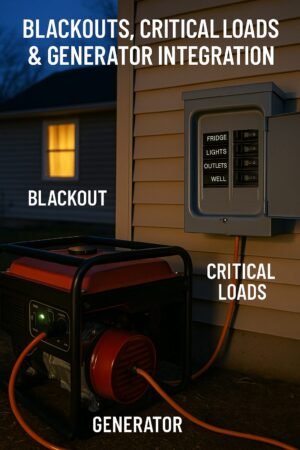
- Critical loads sub-panel: Move only essentials (fridge, lights, Wi-Fi, some outlets) so your battery lasts longer.
- Transfer switch/interlock: Prevents dangerous backfeed to the grid.
- Battery strategy: Size for hours of realistic overnight use.
- Generator as last resort: Auto-start integration can cover multi-day storms; store fuel safely, test monthly, and vent properly.
11) Monitoring, Troubleshooting & Future Expansion
- Monitoring: Watch daily kWh, peak power, battery SoC, and alerts.
- Common issues: Tripped breakers/GFCI, loose terminations, unexpected new shade, dirty glass.
- Data-driven tuning: Compare actual output to expected for your PSH; mismatches can flag string or optimizer failures.
- Plan to expand: Leave inverter headroom, choose batteries that allow parallel growth, keep panel models/voltages compatible, and check main-panel capacity.
12) Step-By-Step: Your First Self-Sufficient Solar Plan
- Define goals: Savings only? Backup? Full independence?
- Gather data: kWh/day, PSH, roof layout, shading notes.
- Quick size: Use the simple method above for the array, inverter, and battery.
- Pick architecture: Grid-tied, hybrid, or off-grid.
- Budget with incentives: Rough payback using your rates and export rules.
- Decide DIY vs pro: Factor permits, interconnection, warranty.
- Draft design: Module layout, one-line diagram, BOS list, wire runs.
- Build & commission: Inspections, utility approval, app monitoring.
- Run a blackout drill: Verify critical loads, adjust priorities.
- Maintain annually: Clean, inspect, update, document.
13) FAQs (Beginners Ask These Next)
- Can panels overcharge batteries? Not with a proper charge controller or hybrid inverter—voltage/current are managed.
- Will solar run my AC or my well pump? Yes, if you size for the starting surge and continuous watts or put them on grid-priority circuits.
- Do I need a special meter for grid-tie? Your utility will specify the net or bi-directional meter during interconnection.
- Is a generator still useful with batteries? For long storms and full off-grid, yes—it extends autonomy.
- What happens when I sell the house? PV often adds value; it provides documentation, warranties, and production history.
14) Resources & Next Reads
Internal links (microhomesteader.com):
- Basics/How PV Works → How Solar Panels Work: Simple Guide to Sun-Powered Energy
- Components Deep-Dive → Solar Panel System Components Explained
- System Types → Grid-Tied vs Off-Grid Solar Systems
- Costs & 2025 Incentives → How Much Do Solar Panels Cost in 2025?
- Weather & Shade → Do Solar Panels Work at Night? Cloudy-Day Truths
- Placement/Tilt → Optimal Angle & Placement for Solar Panels
- Efficiency Factors → What Affects Solar Panel Efficiency?
- Lifespan & Warranties → How Long Do Solar Panels Last?
External references (helpful tools):
- Peak-sun-hours & performance: NREL PVWatts® Calculator
- Incentives database: DSIRE (Database of State Incentives for Renewables & Efficiency)
- Solar resource maps: Global Solar Atlas / NREL Solar Data
Practical Takeaways
- Start with your energy use, not panel count.
- Pick a system architecture that matches your outage risk and budget.
- Shade and site matter more than most people think—optimize early.
- Batteries are for resilience; they can help bills, but the value is keeping essentials running when it counts.
- Monitoring is your friend. It turns guesswork into data-driven tweaks.