Critical loads subpanel or whole-home backup? Compare cost, complexity, comfort, and sizing so you pick the right setup for outages without overspending.
If you’ve been researching home backup power for more than 15 minutes, you’ve probably hit this fork in the road:
Do I back up just a few critical circuits… or the whole house?
And the internet answers it like this:
- “Whole-home is best!”
- “Critical loads are cheaper!”
- “It depends!” (my least favorite answer)
So let me make this practical.
In this post, I’ll walk you through:
- What a critical loads subpanel is
- What whole-home backup really means
- What usually costs more (and why)
- simple decision paths so you can pick without regret
If you’re new to the backup power pillar, start here:Backup Power for MicroHomesteads: Batteries, Generators & Critical Loads
TL;DR
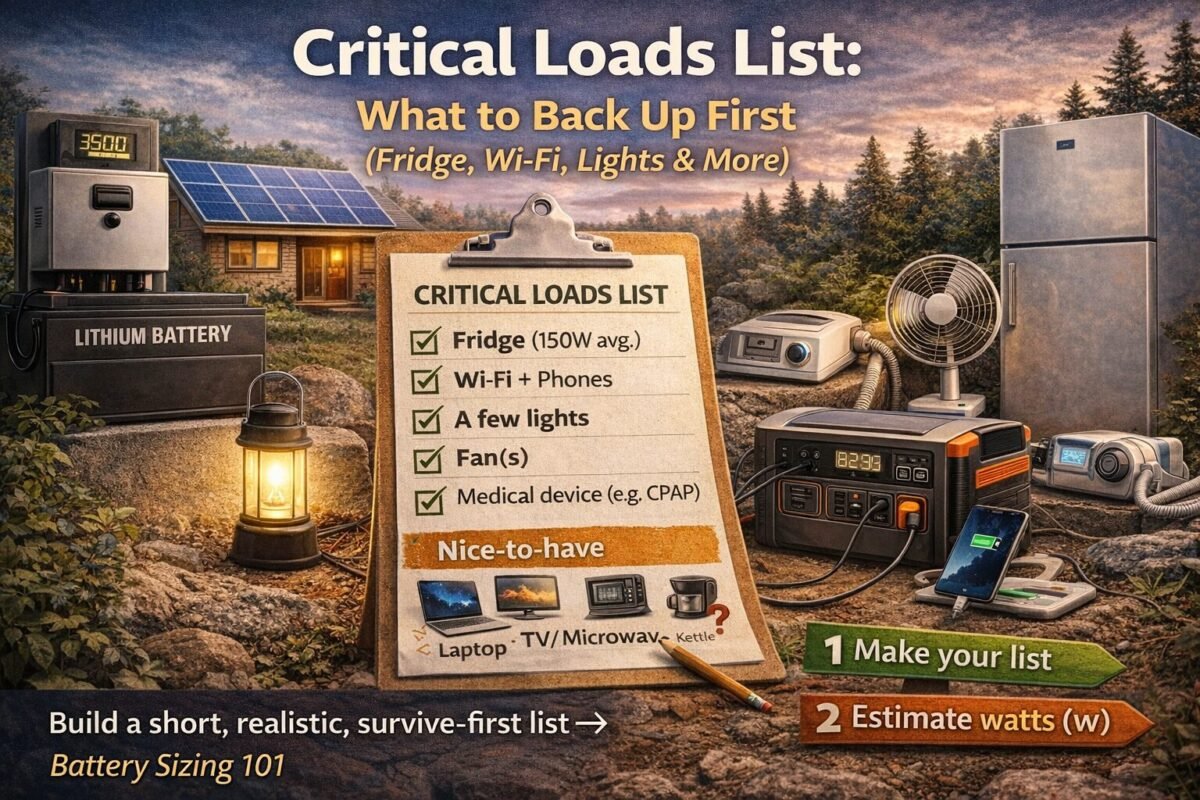
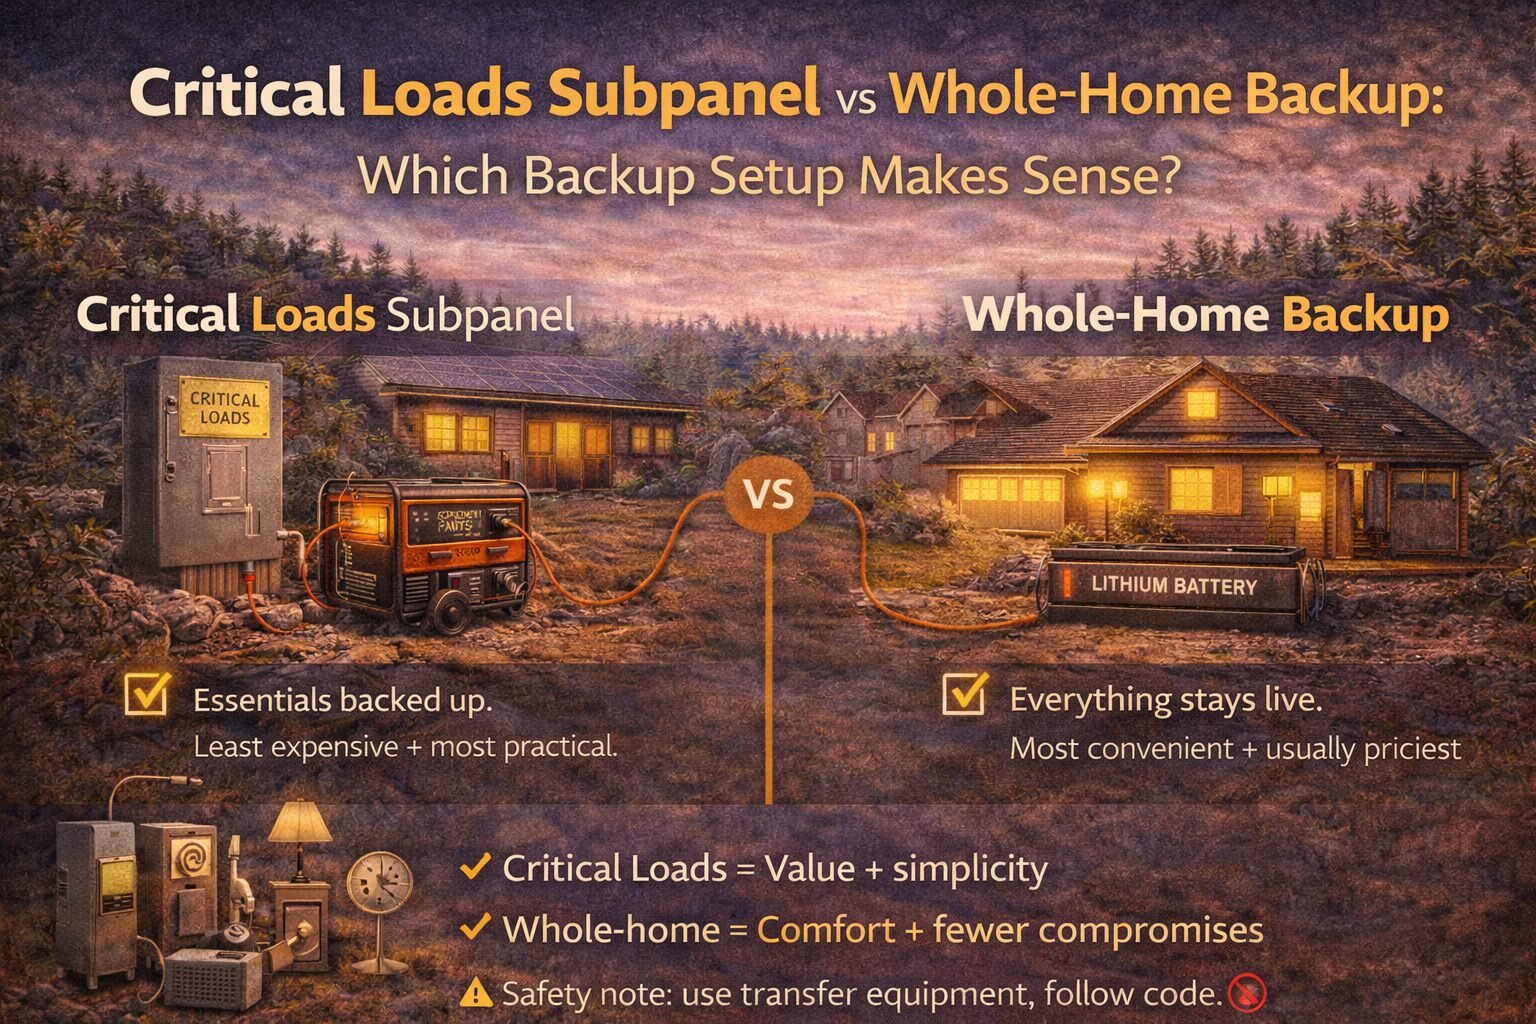
- Critical loads subpanel = back up the essentials (fridge, Wi-Fi, lights, fans, medical). Cheapest + most practical.
- Whole-home backup = your whole panel stays live. Most convenient, often most expensive.
- Critical loads wins when you want value + simplicity. Whole-home wins when you need comfort + fewer compromises.
- Your loads list decides everything. Start here:
Critical Loads List: What to Back Up First (Fridge, Wi-Fi, Lights & More)
What’s the difference?
Critical loads subpanel (a.k.a. “essentials panel”)

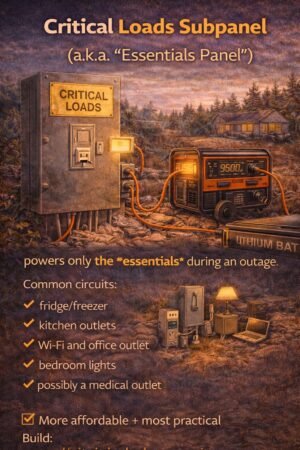
A critical loads subpanel is a separate, small panel that contains only the circuits you want powered during an outage.
Think of it like a “VIP section” for electricity.
Common circuits you’d put on it:
- fridge/freezer
- kitchen outlets (maybe just one circuit)
- Wi-Fi/router and office outlet
- bedroom lights
- bathroom outlet
- medical device outlet
- maybe a small pump or a few specific outlets
During an outage, your battery system (or generator + transfer setup) powers that panel.
Whole-home backup
Whole-home backup means the entire main panel can stay energized during an outage—so any circuit can run.
Important note: “whole-home” does not automatically mean “run everything at once like normal.”
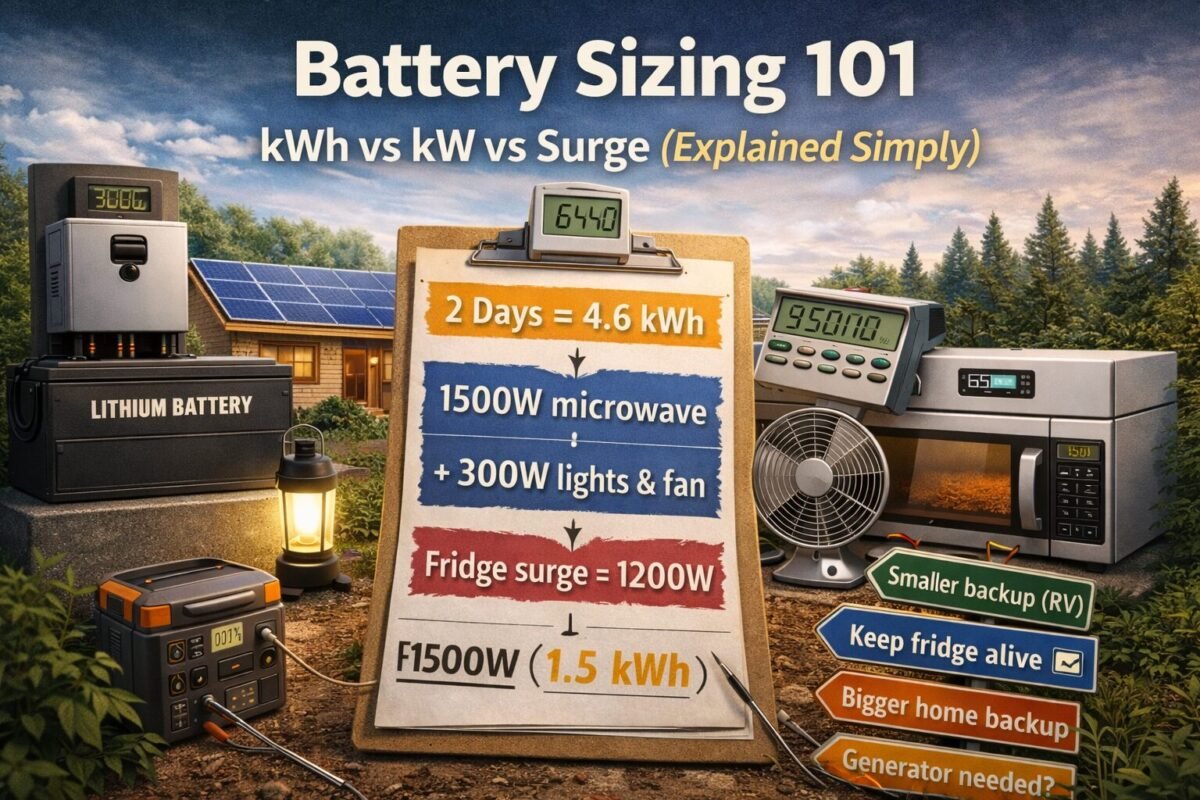
It means the panel is live, and then your system still has limits (battery kWh, inverter kW, surge, etc.).
The biggest misconception: whole-home doesn’t mean unlimited
Even with whole-home backup, you still have to respect:
- kWh (how long you can run things)
- kW (how much you can run at once)
- surge (motor startup spikes)
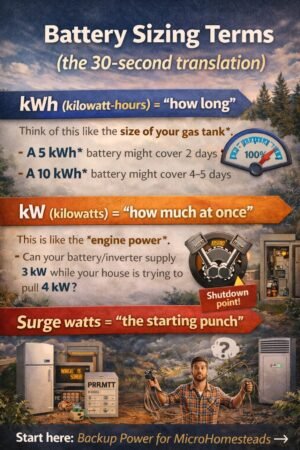
If these terms are fuzzy, read this first:Battery Sizing 101: kWh vs kW vs Surge (Explained Simply)
Pros and cons (the honest version)
Critical loads subpanel — Pros
✅ Cheaper to build and size
You’re only paying to power what matters.
✅ Smaller battery and inverter needs
If you’re not trying to cover AC/dryer/oven, your system can be much simpler.
✅ Less “accidental overload” risk
Because only selected circuits are live during outage mode.
✅ Great for microhomesteads and realistic backup goals
It matches how most people actually live during outages anyway.
Critical loads subpanel — Cons
❌ You must choose circuits ahead of time
(You can change them later, but it’s not as flexible.)
❌ Some homes need extra electrical work to do it cleanly
(Depends on panel layout and wiring.)
Whole-home backup — Pros
✅ Convenient
No “which outlet is backed up?” confusion.
✅ Flexible
You can decide what to run in the moment.
✅ Works well with smart load management
Some systems can automatically shed big loads to prevent overload.
Whole-home backup — Cons
❌ Usually more expensive
Because you’re designing for higher peak loads and more complexity.
❌ Easier to overload if you forget you’re on backup
Someone turns on the oven + dryer, + microwave, and the system says “nope.”
❌ More likely to trigger “hidden costs (electrical).”
Service upgrades, panel work, subpanels, transfer equipment, etc.
Read this early (it saves money):Hidden Costs of Solar: Avoid Budget-Killing Surprises
Cost + complexity: what typically changes the price?

I’m not going to throw random national averages at you (they vary wildly). Instead, here are the cost drivers that matter everywhere:
A) Electrical scope
- critical loads subpanel wiring
- rewiring circuits or moving breakers
- transfer equipment
- conduit runs / labor complexity
B) Inverter size (kW) and surge capability
Whole-home systems often require higher kW and better surge handling.
C) Battery capacity (kWh)
Whole-home comfort goals push you toward more kWh.
D) Load management tools
Whole-home backup often benefits from load-shedding or monitoring.
Step-by-step decision process (simple and fast)
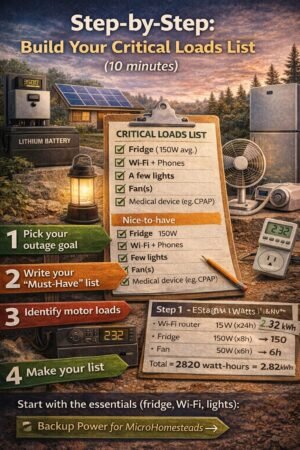
Step 1) Build your critical loads list
Do this first:Critical Loads List: What to Back Up First (Fridge, Wi-Fi, Lights & More)
Even if you end up going whole-home, this list tells you what you actually care about.
Step 2) Ask: What’s your outage reality?
Pick one:
- Short outages (hours to 1 day)
- Storm outages (1–3 days)
- Long disruptions (3+ days)
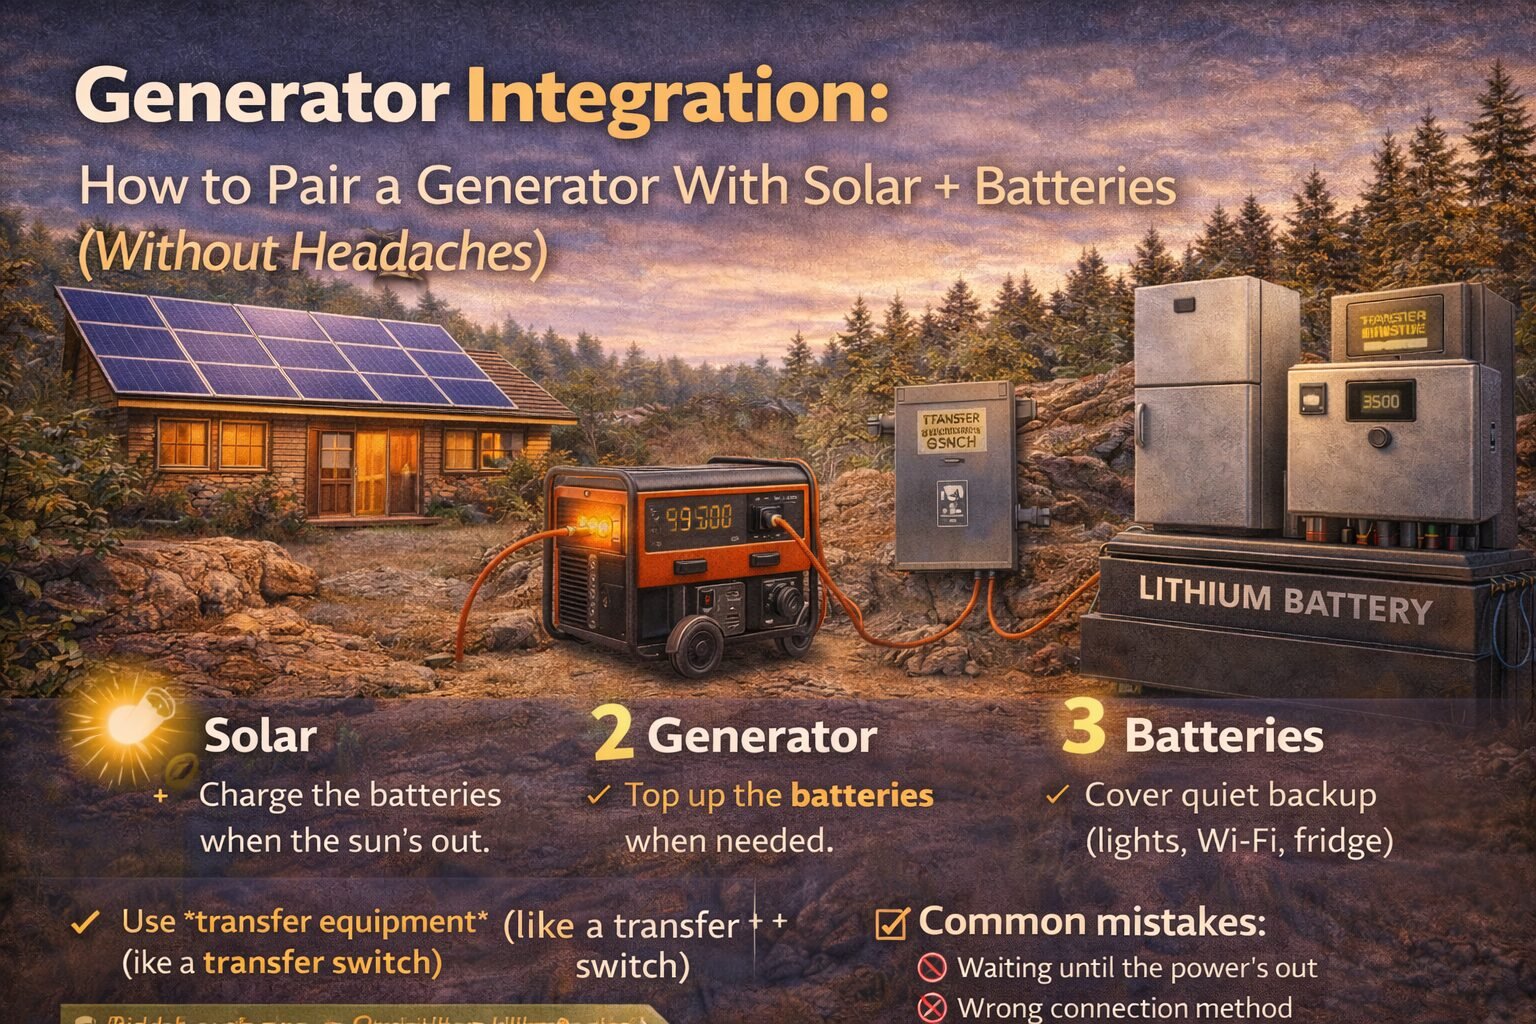
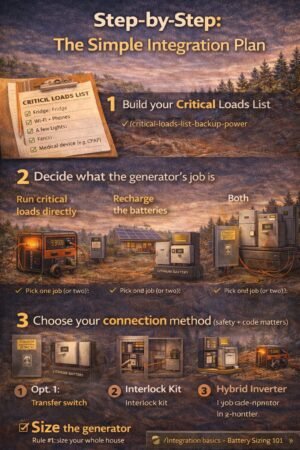
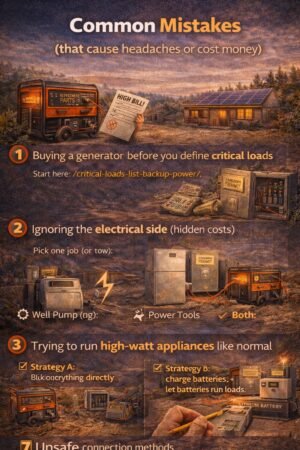
If you’re planning for multi-day outages, also read:Generator Integration: How to Pair a Generator With Solar + Batteries (Without Headaches)
Because generator integration can be cheaper than stacking batteries forever.
Step 3) Do you have any “big loads” you refuse to live without?
Examples:
- central AC
- well pump (can be huge surge)
- electric range/oven
- electric water heater
- dryer
If you “must” run big loads, the critical loads subpanel may still work… but you’ll be much more selective (or you’ll add a generator + specific circuits).
Step 4) Choose your path
Path A: Choose a critical loads subpanel if…
- You want maximum value
- You can live without big appliances during outages
- You prefer a system that’s hard to overload accidentally
- Your goal is “keep it running,” not “live like normal.”
Path B: Choose whole-home backup if…
- You want a seamless experience
- You’re willing to pay more for convenience
- You’ll use monitoring/load management responsibly
- You have medical needs or business needs that justify comfort + flexibility
Real-world examples (what this looks like)

Example 1: “Keep it running” home (best for critical loads)
Backed-up circuits:
- fridge + freezer
- Wi-Fi + office outlet
- bedroom lights + phone charging
- one bathroom outlet
- a couple of kitchen outlets
This usually pairs well with:
- modest battery sizing
- good surge handling for fridge/freezer
- optional generator for long cloudy stretches
Example 2: “Comfort mode” home (either can work)
They want:
- fridge/freezer + lights
- fans
- microwave sometimes
- more outlets live
This can go either way:
- a bigger critical loads subpanel, or
- whole-home with careful load use
Example 3: “I want AC during outages” (whole-home tends to be more realistic)
This typically pushes you toward:
- larger inverter
- more battery
- Sometimes generator support
- load management
Common mistakes (that cost money)
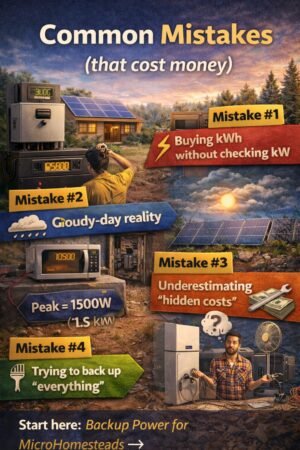
Mistake #1: Choosing whole-home because it “sounds better.”
Whole-home is great… if you can afford the kW/kWh that matches your expectations.
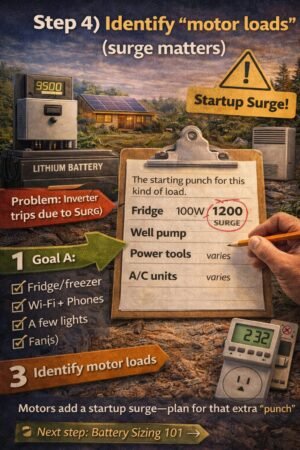
Mistake #2: Building a critical loads panel but forgetting the “surge” issue
Fridge compressors, pumps, and motors can trip smaller inverters.
Mistake #3: Forgetting the hidden electrical work
A lot of backup projects are really “electrical projects with a battery attached.”
Read this early:Hidden Costs of Solar: Avoid Budget-Killing Surprises
Safety note (please don’t skip)

Anything involving your main panel, subpanel wiring, transfer switches, or interlocks should be handled by a licensed electrician and follow local code. This post is educational only.
FAQ
Do I need a critical loads subpanel if I have a power station?
Not always. Many people run a fridge and a few essentials with extension cords in an outage. It’s not as clean or seamless, but it can work for “simple backup.”
Does whole-home backup increase my electric bill?
Not directly. It’s about outage capability, not regular grid use. But it can indirectly encourage running more loads during outages, which increases backup system needs.
Can I start with critical loads and upgrade later?
Yes—and that’s honestly one of the smartest approaches. Build a reliable “survive-first” system, then expand if you find you really want more comfort.
Next step
- Make your list:
Critical Loads List: What to Back Up First (Fridge, Wi-Fi, Lights & More) - Do the math:
/Battery Sizing 101: kWh vs kW vs Surge (Explained Simply) - If you’re planning for multi-day outages:
Generator Integration: How to Pair a Generator With Solar + Batteries (Without Headaches)